
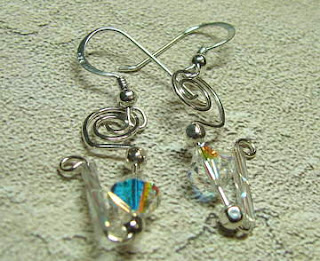
This weekend before I got sick I purchased more photo paper to experiment with photos. Below are 2 pictures, 1 using the dark grey linen, and 1 with the marble-ly light grey. Wow! the titanium colors really pop on these papers! Which do you like better, the dark grey or the light? let me know..... Tomorrow I'll finally get pics up of the titanium necklace.. these are the earrings to it btw.....
Wednesday, March 11, 2009


Saturday, March 7, 2009
More handcrafted earwires......

 I thought I would show more of my experiments with handcrafted earwires... this time actually attached to the rest of the earring! First up is an all in one heart design, I actually made this around Valentines' day but it took me abit to get pictures done. This pair I made with crystals. Second pair up is the round style, which I though perfectly complimented the wirework on the earrings.. doing these loop in loops were fun!
Next is my leaf or feather earwires, with a simple faceted agate beads I purchased at the beadfair 2 weeks ago. Yummy!


Ok it's hard to see them in this picture, but the earwires are just simple ones, made with a ball on the end... The fab beads btw is again lampwork beads from Jodie Marshall. It's kind of funny, I bought some new ones from her, and as I was putting them away ran across these, and just had to make more earrings! I've been on an earring kick!
Sunday, March 1, 2009
Titanium and Niobium finished jewelry... woo hoo!
 I love these first earrings... made of titanium, I added pearls... I made the earwires also.. same with earrings pair 2... the bead is another pearl in this really wonderful dark dark Capri color, hard to tell that from the photo.

 Next up is my "crayon id" bracelet design, only the base of this one is Niobium. Last is a pair of vintage crystals with a coil of titanium around them, on titanium earwires. I'll more stuff in the future.

Wednesday, February 25, 2009
More Class items....... And Jodie Marshall is my favorite Lampwork Lady!
 Last Weekend was fun... My hubby went out of down to a convention, so my Friend Anne, her daughters and another friend Jody came over to hang... we also went to the bead show held in West Des Moines. One of my favorite ( as in I want to lampwork like her when I grow up) lampworkers Jodie Marshall was there! I had to buy some of her beads of course.. and the naughty woman slipped an extra bead in my bag when I wasn't looking! Don't worry, sometime when she least expects it, I"ll pay her back! BWAHAHAHA!! But I thought she would like to see what I made with a few of the beads I'd bought... a simple pendant... and these earrings! I loved how the earrings turned out!! They almost "float" under the ear wire.. it's very interesting effect, and something I"ll have to make more of! Jodie's beads are always very inspiring! See more of her work here: http://marshalljodie.blogspot.com/

 Here are a couple more pics of components I've made in Titanium. I love the watercolor blends you can get on Titanium! The moon shows this off pretty well!


Last is my favorite niobium piece to date.. a leaf! I hand cut this out of niobium 26 ga sheet, sanded, drilled, and colored.. soon to be in a very kewl necklace, have no fears!!!
Next time I"ll show off a few pieces of actual finished jewelry using Titanium and Niobium.
Monday, February 16, 2009
Update on my class....
 I've gotten asked how my class is going.. and my answer is it's wonderful! I'm taking a class that shows how to work with Titanium and Niobium. The first picture shows a pile of findings and charms I've made. Notice the lovely light steely-grey cast to the metals. Most of the stuff in this photo is Niobium. Next few photos are components I've made. The flower and frame are Niobium, as well as the right pair of earwires after they have been anodized. The left pair of earrings is Titanium, which has a matte look in comparison. The colors are brighter and kewler in person! I'll have actual finished jewelry soon don't worry, but I"m having fun making the components at the moment!


Saturday, February 14, 2009
More Framed Earrings.....


I made the frames on these earrings using "bezel forms". These are the kewlest tools, I bought a set at Christmas for myself as a Prezzie.... and they are worth every penny. I've made a few pendants using them, which is what they were made for, but I've used them for other wire bending tasks... like the oval frame on the purplely-blue earrings and the triangle on the hematite ones. I've also made handmade ear wires using them, like pictured below.  I call these my leaf earrings, but I actually used the teardrop shaped bezelform. If you are a wire artist, you should check them out: http://bezelform.com/ I know on some of the artist groups I'm on there has been "talk" that the bezelforms are cheating. I really take umbrage at that... before I bought these I still used something to help shape the earrings, including traditional mandrels and sharpie pens. Bezel forms are like 1 inch long mandrels. They are easy to hold on to, and fit well in my hands. These bezel forms just makes it easier, it doesn't make it less handmade. I still have to cut the wires to the correct length, hold them just so to make the shapes against the bezel form, carefully hammer flat part of the curve so they fit properly, file and sand the ends so they are not sharp or harmful to wear, and then tumble them in my tumbler to polish and work harden them. All of this takes knowledge and experience. To me saying that if you use a form makes them less somehow.. well if you cannot use tools to make your art, what are you going to do, cut the wire with your teeth???? I assure you, I use hygienic Linstrom cutters on all of my earwires!! Using tools as an artist is just being a smart artist, not a cheat!
 I call these my leaf earrings, but I actually used the teardrop shaped bezelform. If you are a wire artist, you should check them out: http://bezelform.com/ I know on some of the artist groups I'm on there has been "talk" that the bezelforms are cheating. I really take umbrage at that... before I bought these I still used something to help shape the earrings, including traditional mandrels and sharpie pens. Bezel forms are like 1 inch long mandrels. They are easy to hold on to, and fit well in my hands. These bezel forms just makes it easier, it doesn't make it less handmade. I still have to cut the wires to the correct length, hold them just so to make the shapes against the bezel form, carefully hammer flat part of the curve so they fit properly, file and sand the ends so they are not sharp or harmful to wear, and then tumble them in my tumbler to polish and work harden them. All of this takes knowledge and experience. To me saying that if you use a form makes them less somehow.. well if you cannot use tools to make your art, what are you going to do, cut the wire with your teeth???? I assure you, I use hygienic Linstrom cutters on all of my earwires!! Using tools as an artist is just being a smart artist, not a cheat!
Monday, February 9, 2009
wow, the difference natural lighting makes......
 More experiments ... picture one taken with otts lights probably late at night... and 2nd picture, taken last weekend with natural light through my studio window. Wow! I need to play around with angles, but it really is all about lighting baby!

The sterling leaves here will be in etsy this week... part of my art jewelry components I've been working on. They match the sterling pendant leaf I've got listed already: 
http://www.etsy.com/view_listing.php?listing_id=19898262
Saturday, February 7, 2009
Playing with backgrounds....
 One of my goals this year is better pictures, at least for etsy and my website. So here is an attempt to better capture clear/white items. First up is a lovely pendant I made ( and it's a "hint" on the challenge piece, hint hint) with clear crystals and pearls. It's about 2 inches around if you are curious.. against new "normal" background, it looks alittle washed out.

One of the websites for photo tips suggested black velvet. Second photo is black velvet.. while it really "pops" it does lack some detail.. I think in this case my lighting was too strong!
 Here is another case, a pair of earrings in sterling and clear crystal. Again, it pops on the black, but the silver is too bright and lacks detail. Last photo is just the black.. the light background didn't turn out at all.


 Here is another case, a pair of earrings in sterling and clear crystal. Again, it pops on the black, but the silver is too bright and lacks detail. Last photo is just the black.. the light background didn't turn out at all.
Let me know what you think!


Tuesday, January 27, 2009
Good Bye to Kisa Rowena

We lost one of the fur babies in my household this week, Kisa Rowena. She was our inside -outside ( her choice, not mine) half Persian cat of 12 + years. Despite her ornery nature and an insidious ability to teleport food off your plate (earning her the nickname of "land piranha" by the Hubby) she was a good cat and will be missed. I hope you rest well in your own private spot of sunshine, with lots of squinties to chase and self-opening cans of tuna, where ever your spirit lands, that it lands on it's feet. Good bye Kisa.
Wednesday, January 21, 2009
I'm soooooo excited........
I had my first Art Museum class tonight.. It's called "colorization of Titanium, Niobium, and Copper Surfaces" I'm going to have so much fun, I can't hardly wait!! First thing tomorrow I"ll be ordering a small stash of Titanium and Niobium to play with in the class.. Later in the class we will work with copper. The Teacher is Rob Sunderman ( http://www.robertsunderman.com/portfolio.html ) and he seems very kewl. His style is laid back, which I really appreciate, cause I've taken some classes that weren't. Nothing squelches creativity and learning like being afraid of doing something "wrong". He's all for experimentation. For example, he demonstrated how anodizing is done, and discussed resistance for doing special color effects. The typical resistance material is a sticky tape substance. However we started making other suggestions (like fingernail polish or glues) and he was all for trying them, as long as they wouldn't cause a harmful reaction or contaminate the dipping solution. Did I mention how much fun I"m gonna have in this class??
Hopefully in a few weeks I"ll be showing off some of my new skills... til then, I'll keep working on my other projects.


 I'm also working on my South Dakota Challenge
 for 2009-- here is a sneak peek... yes these are soldered. More to come!
I originally took this class because it hi-lights cold connections, something I'm really trying to explore right now. I looked at the colors as sort of a secondary thing, despite it's what the class is about. Since Titanium and Niobium are hard/impossible to solder ( the melting temps are insanely high, 3038 f and 4474 f respectively) cold connections are the way to go. I've already sketched several ideas, and some might even be possible! Man, I'm gonna have fun in this class!!!!
Hopefully in a few weeks I"ll be showing off some of my new skills... til then, I'll keep working on my other projects.
One of those is making more of my own findings. Some designs just work better with custom findings, but I like the "plug and play" nature of purchased findings. So I'm trying to make some every week so I'll have stash for show season in May. I'm also selling these on Etsy (you can see them here http://www.etsy.com/shop.php?user_id=5543133§ion_id=5871174 ). Below is a few pics showing some of my styles. My favorites so far is the leaf earwires. I'll be making more of those!


 I'm also working on my South Dakota Challenge
 for 2009-- here is a sneak peek... yes these are soldered. More to come!
Sunday, January 18, 2009
Reorganizing my studio part II......
I started to reorganize my studio area in the attic in Dec ( you can see "before" pictures here: http://mkpbeadart.blogspot.com/2008/11/my-current-activity.html#links ) The before shots show my main bead area, the front area that I used mostly for storage, and the spare bedroom/storage for everything in the house. I'm not done exactly, but I'm getting there. The idea is that I would utilize all the attic instead of part of it. I want to create 3 areas for jewelry making instead of the 1 spot I have now, to reflect my growth as an artist and crafts person... I've picked up skills that have different space requirements. As I still do some seed beading and such, I wanted to retain my regular station also. So the day bed has been moved to the front of the area. I think of it as a couch for potential customers that might stop by. This front area has always been sort of "dead" space, as it's narrow and you can't block off access to the other 2 "rooms". I looked at moving one of my "stations" to this area, but it would make it soooo crowded to have to walk by it.. I want my Studio to be airy and open, as least as much as possible. My Attic is sort of like a fat, squat "T". Opposite the bed is the counter built over the stairway... if a potential customer is coming over I can spread out jewelry on the counter.
 This front area has always been sort of "dead" space, as it's narrow and you can't block off access to the other 2 "rooms". I looked at moving one of my "stations" to this area, but it would make it soooo crowded to have to walk by it.. I want my Studio to be airy and open, as least as much as possible. My Attic is sort of like a fat, squat "T". Opposite the bed is the counter built over the stairway... if a potential customer is coming over I can spread out jewelry on the counter.
I've left my primary jewelry making area mostly alone, the biggest change is I moved the books to the other room where the bed used to be. This gives me more room for beads and material's, as my space was getting crowded.  The picture below shows that space. I added a back table as one of the things I needed more of is just surface space to lay things/projects out. Notice my little oil heater.. the studio while I love it dearly, is cold, there isn't any heat up here. Notice my overflowing garage can, I need to clean my space like always! LOL
 Here is leading into the "new" space, where the day bead used to be. (see my rolling mill on my counter... I love that thing!!!) The table is temporary, My dad is going to help us build a proper bench that will go here. Where the brown chair is will be my metal area, it's not completely set up yet. On the other side of the bench will be the lampworking area. Below is most of my lampworking stuff, including the glass organized and ready to go just as soon as the bench is set up! I've moved all of my lampworking books to this area also.

The last picture is the opposite side... this is where most of the books and magazines have moved to, and some general storage.
 The picture below shows that space. I added a back table as one of the things I needed more of is just surface space to lay things/projects out. Notice my little oil heater.. the studio while I love it dearly, is cold, there isn't any heat up here. Notice my overflowing garage can, I need to clean my space like always! LOL
 Here is leading into the "new" space, where the day bead used to be. (see my rolling mill on my counter... I love that thing!!!) The table is temporary, My dad is going to help us build a proper bench that will go here. Where the brown chair is will be my metal area, it's not completely set up yet. On the other side of the bench will be the lampworking area. Below is most of my lampworking stuff, including the glass organized and ready to go just as soon as the bench is set up! I've moved all of my lampworking books to this area also.

The last picture is the opposite side... this is where most of the books and magazines have moved to, and some general storage.
Once I get the bench set up proper I'll post that also! 

Sunday, January 11, 2009
More resolutions
Yep, as promised I'm going to share a few more resolutions, but first, take a look at these star earrings I made for a Christmas gift this year. I used 21GA sterling square wire, and soldered them together as a chain. I'm very pleased how they turned out, it's hard to tell on some of the stars were I soldered them!  I've come to the conclusion that soldering isn't really hard, it's all the prep work and post work that is! To make these I first cut the wire, bent it into shape, and filed the ends of the wire so they closed well. If you do not have the ends butted properly, it's not going to solder well at all. That's probably the hardest part.. getting the ends to match well. I soldered all the bigger stars first, and then soldered the smaller star.. after I threaded the 2 big ones in it.. you have to be careful not to melt all the pieces together in a ball! After soldering, I pickled them for an hour or so, to clean them up. Then wash them with regular dish water detergent and a scrub pad, Then my least favorite chore. filing and sandpaper-ing at the solder joints to remove the excess solder. After a gentle reshape with pliers, I used my chasing hammer to flatten them.. then a quick polish and tumble. They were a great deal of work, but I'm very pleased they turned out as well as they did, especially as I used a smaller gauge. I was really afraid I'd melt them together in a ball, but I got them right the first time!


 I've come to the conclusion that soldering isn't really hard, it's all the prep work and post work that is! To make these I first cut the wire, bent it into shape, and filed the ends of the wire so they closed well. If you do not have the ends butted properly, it's not going to solder well at all. That's probably the hardest part.. getting the ends to match well. I soldered all the bigger stars first, and then soldered the smaller star.. after I threaded the 2 big ones in it.. you have to be careful not to melt all the pieces together in a ball! After soldering, I pickled them for an hour or so, to clean them up. Then wash them with regular dish water detergent and a scrub pad, Then my least favorite chore. filing and sandpaper-ing at the solder joints to remove the excess solder. After a gentle reshape with pliers, I used my chasing hammer to flatten them.. then a quick polish and tumble. They were a great deal of work, but I'm very pleased they turned out as well as they did, especially as I used a smaller gauge. I was really afraid I'd melt them together in a ball, but I got them right the first time!


This bracelet's been sitting in my picture file for awhile, so I'd thought I would show it now.. it's Botswana agate and sterling silver wire. I love the pinks of this peculiar strand of agate, that's why I bought them in the first place!
Ok, now to the resolutions!! I really need to update my website. (http://www.beadfix.com/)  Now I've made this resolution every year.. but this time I mean it!!! LOL I have time issues ( no, really Kat?) (yes that is sarcasm!) so as much as I would love to have a website with all the bells, with a shopping cart and links to interesting sites and updated well, hourly, it's not going to happen. It's taken me 2 years to understand that... the only way I could have a website like that is if I quit my day job, hire someone to revamp and maintain my website, or stop sleeping. Or possibly all three. I can't quit my day job yet, and I can't afford the costs of hiring someone to maintain the site, but I'll probably get help to revamp it. I don't get enough sleep now.. but that leads into the main issue, what is my website for??
 Now I've made this resolution every year.. but this time I mean it!!! LOL I have time issues ( no, really Kat?) (yes that is sarcasm!) so as much as I would love to have a website with all the bells, with a shopping cart and links to interesting sites and updated well, hourly, it's not going to happen. It's taken me 2 years to understand that... the only way I could have a website like that is if I quit my day job, hire someone to revamp and maintain my website, or stop sleeping. Or possibly all three. I can't quit my day job yet, and I can't afford the costs of hiring someone to maintain the site, but I'll probably get help to revamp it. I don't get enough sleep now.. but that leads into the main issue, what is my website for??
To sell jewelry? I did try a shopping cart once before, about 3 years ago, but it looked clunky and I found it hard to maintain, so I took it off. I joined Etsy last year, and I've been pleased with it. It does all the hard parts of having a shopping cart, and since it has it's own traffic source more people will see my jewelry than just on my website. 

To communicate with my customers? I started this blog a couple of years ago.. I like blogging. The format encourages frequent posting, and so far I've maintained more or less weekly updates. I can even do updates when I'm not home, if I have access to a computer.
So I'm not really sure what I want to do with my website. This month I'm going to be exploring that... I've even considered dropping it.. but then I do have customers that check it periodically, and it's only printed on about 5000 business cards right now... so that's my big question --what do I want? and then I'd deal with what it should look like.
My other main business resolution is taking better pictures. If I'm going to maintain my website this year, the key is better pictures. And for selling on etsy, the better the pictures, the better my sales will be. The mookite pendant shows my first stabs at better pictures. I've been doing some research and one of the suggestions is using scrapbooking paper for backgrounds. Picture 1 shows sort of a parchment background and picture #2 shows a picture of sandy stone.. I like how that one looks. I've taken pictures for the Internet for years now, but I've not been systematic about it... so now when I take pictures for the blog or Etsy I'll be taking notes each time, until I get the settings that work best for my camera. I'll be playing with different backgrounds and lighting set ups. Honestly I think my biggest issue is lighting. Lighting to date is whatever I have in the house. The miracle that any of my pictures turn out at all! (and that I use ott's in the studio probably helps!) I am planing on buying some professional lights just as soon as a figure out which ones I want. And more paper backgrounds I think. That could get fun! And learn to use the timer on my camera in tandem with the tripod, and I bet my pictures will improve drastically! See ya in a few days!
Thursday, January 1, 2009
HAPPY NEW YEAR!!!!! 2009.............
 Happy New Years everyone!!
I don't know about anyone else, but I"m glad 2008 is over!
Business-wise and artistically it was fine, but on a personal level it sort of sucked. Something I realized after hitting the deer though, is I've been so overwhelmed by the bad things, I've sort of overlooked the good things. I've forgotten to celebrate the good in life. So one of my resolutions this year is to feel gratitude for the positive; to look for the the little things that are good and stop focusing on the major bad stuff I can't control anyway. Back in August I made a pendant called "God's Tear" (http://mkpbeadart.blogspot.com/2008/08/week-32-gods-tear.html#links) that was about finding the beauty amidst the sadness, but things kept happening and I lost the thought.... well I refuse to do that again! Have you ever heard of comic artist Keith Knight? I love his artwork, it's very expressive, and he started a strip within his strip that he calls Life's Little Victories. You can see one of his strips here: http://www.salon.com/comics/knig/2008/12/31/knig/index.html . I've decided this is an excellent way to accentuate the positive in my life.. so everyday I'm going to be looking for that victory... and stop worrying about the next shoe to drop. Today's ( #6 for me, I started this on Monday) was grand... being able to sleep in as late as I wanted, and still wake up before my daughter did! YES! (it's very important to say YES! with the exclamation point after you find your victory.. so repeat after me... YEESSS! )


I have a few other goals this year, and I'll share them all I'm sure in the next few weeks, but a big for me me is I'll be posting at least weekly on this blog. I've actually quite proud that I've managed to post mostly on a weekly basis for almost 2 years now. In fact, this will be my 100th blog! However I did so because I was doing YOJ weekly jewelry challenge, but I'm taking a break right now, at least for this quarter... so my posting will be on my own. I've got some exciting plans for my art this year, and I want to save my limited time for them right now.
What about the pendants in this entry? Each one is in a different style, so you know I've had fun making them! This year I'll continue exploring wireworking and metal techniques. I'm taking a class on cold connections starting in a few weeks, I'm very excited about that! I'm hoping to take more classes this year, even perhaps trying other mediums. Learning is one of the steady joys in life, and I am ready to embrace happiness again!
Subscribe to:
Posts (Atom)


