Thursday, April 17, 2008

YOJ: Week 18- 2nd Bezel is Done!


I'm so jazzed!! this is my 2nd completed bezel. It's all in sterling this time, and I relied heavily on Don Norris's techniques for this one. It's not perfect, but I'm very proud of it. I really feel like I'm getting a handle on using the torch and how the metal acts. The stone is sodalite. The polish on this one is much much better and cleaner than on my first one. Don's method of "fast with gloves" is a winner. For my buffer machine I'm using my dremel at approximately 20,000. I do turn down the speed on the more detailed areas. 
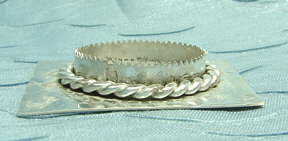
I also have alittle fire scale on the back, it probably doesn't show in the pictures, it's just a slight color difference in spots. It took me 3 tries to get the bezel all the way securely soldered to the back, I suspect that I burned the 
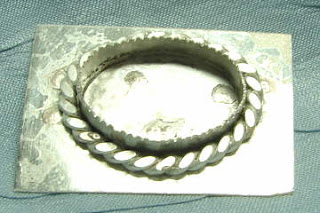
metal somewhere in that process. You can see where I soldered (or didn't solder) the bezel in these pictures. I had it all the way sanded down at one point, and discovered I had 1 corner of the bezel not locked down.. when I resoldered it most of the solder from the bezel joint flowed away... I'm afraid if I polish it anymore it will undercut. So lesson learned: I'm not polishing the bezel part until I'm absolutely sure I'm finished soldering in the future. I'm amazed how much I've learned just doing the first 2 bezels. 
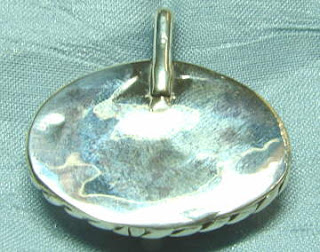
And this was quicker, I took off Weds from work and did most of this one in 1 day!

YOJ: Week 15 & 16 Aries and not on topic


Week 15 is Aries. Aries is a "masculine " sign- It's rather depressing, but this means it's a extrovert or "positive" sign, not necessary a "guy". Seems like a slam to all those wonderful women born in this time frame each year, but I didn't set the astrological rules. Still, after last weeks' hubby watch design, it's gotten me to think more about design jewelry for males. Or more specifically, jewelry that either sex could wear without feeling out of sync. So when I set out to make this pendant, I was keeping that concept in mind. I used 14 ga copper ( copper is the Aries metal) and then spent quite a bit of time texturing it. I made the rings and alittle bail to hang it on with 16ga. It's very simple, which I think would allow a male Aries wear it, yet pretty enough that a female might enjoy owning it also.


For Week 16 I made these copper washer earrings. Now they seem very simple to the casual eye, but they represent a great deal of work. Let's start with the washers. I got these through Harbor Freight, and my first attempt to texturize them fail miserably. The washers are rock hard, no bend in them at all.. So I set them aside for a couple of months.


Enter my metalsmithing class at the local art center. I know that metal comes in different tempers, but in the class the teacher demonstrated how to change metal from work hard to dead soft - and easy to work with - again. I remembered the washers!! So I annealed a handful of washers, and boy, does that make a difference trying to hammer them. I thought the first time my hand was going to fall off!! (let's try an experiment.. get a penny and pound it with a hammer.. you might dent it, but it's seriously hard. that's exactly how the washers were)


Delighted, I decided I wanted a light, almost matte sort of texture for these earrings. I've always wanted to make my own texture hammers, so I got out my dremel and went to town on a cheapo hammer. Now I'm not all that used to power tools, certainly not to alter steel.. so what happens when you touch steel to steel, especially if some of the steel is moving at 35,000 rpm's ... you get sparks. duh! I wasn't expecting sparks.. infact to keep the mess down in my studio I'ld laid newspapers about 2 inches under and around where I had the hammer... fortunately I didn't catch my studio on fire, and i"ll be prepared the next time. But I was really nervous there for a while. It was worth it, I got exactly the effect I wanted with my new hammer. It's interesting though, the texture on the hammer head gets pounded in with each use.. so at some point I'll have to retexture it. ( I'll skip the newspaper and just clean the floor next time.. or better yet take it downstairs to the torch area where it won't hurt anything if it sparks) I used crystals and quartz crystal. I've made a 2nd pair for sale in black crystals.. used different hammers on the washers. I just love to play with my hammers!!


Tuesday, April 15, 2008

YOJ: Week 17 Growth

I had a bunch of sketches for this, but right now I"m so focused on learning soldering and metalsmithing, I can't bring myself to do anything but projects that practice these skills. Then it hit me, growth as an artist, is well, growth. I'm very please to show you my first completed metal bezel: Growth. This took Hours! to make, I can only hope as I get better, they will get quicker to make. Let me outline the steps it took to make this. First I cut out a square from copper sheet. Then drew a circle on it, and sawed it out for the base. Then I filed, filed and filed some more to get it as round as possible. Then I sanded. then I filed and sanded some more. I did this off and on for a couple of weeks, when I had a spare moment or in my class. While I worked on making the circle as circle like as I could stand, I also cut out a strip of copper sheeting, and then used a rolling mill to make my bezel wire. ( you should be able to see in the pictures a rim of copper directly on the stone.. that is the bezel wire. It's maybe 1/8th of a inch tall, 26 ga and it's actually what is holding the stone in place) I made a total of 3 bezel wires before I could get it right.. this required filing and sanding, filing and sanding, making it 2 small 2ce, and finally getting it just right. Then I soldered it. I'm happy to say that only took once. I used 2 much solder so I had to file and sand off the extra. (In the picture of just the bezel, you can see the blobs o silver on the inside!) Then I had to sand it down because it was 2 tall. The goal is to make the bezel wire just tall enough to crimp over the edge of the stone to hold it in but not 2 tall to obscure the stone or buckle up when you crimp it. IF you make it 2 tall, it will buckle up and be unsightly. I fortunately had my teacher at the art center to help with this part. I got it now, but I think that was the hardest part.. I kept sanding it down, asking her if it was OK, she'd be like it's 2 tall and make me sand some more. this took hours to do also. Once I had the bezel wire right, I made the decorate sterling twisted wire in a perfect circle that fit snugly over the bezel wire. I had to solder that also. It took me 3 tires to get the wire right. I'm very pleased with the wire decoration.. it's hard to tell where it's connected and soldered. It took some effort to match the twists up so it would look that good. then I flattened the wire just alittle.. so it would solder better to the base piece and I like the look of flattened twisted wire. then I had to solder the bezel and the twisted wire to the base. that went well.. I had a couple solder spots on the inside of the bezel, I used my dremel to grind those down so my stone would lay flat in the bezel. I also used my dremel for the polishing steps. I've had to miss a few classes at the art center, so for polishing I relied more on Don Norris's CD (BTw I really recommend his series on silver smithing. Very common sense approach to the whole process. I've added his website to my links) I decided I wanted to make a wire bail, so I made a hole, and used my dapples to make it nice and even. then I fitted the stone in, carefully crimped the metal over the edge, did the final polish with the dremel, than ran it in the tumbler for 2 hours.


It's not perfect, but I am in love with it. It represents hours and hours of work, frustration, tedium ( and if you know me, you know I don't do bored well) and frankly tears. But I made it, and I bet the next one will be better. I'm very, very proud of my first student piece, and it's a keeper.. in fact I'm wearing as I type this!

Friday, April 11, 2008

Week 14: Jerry's Request

OK this weeks subject is "fool's gold" but I couldn't really come up with good ideas. In fact right now I'm so busy with RL and when I'm not (about 5 minutes!! ) I"m obsessed with metal smithing-- Which so far seems to fondling the tools and materials, paralyzed with indecision on what to make while burning solder. More on smithing later...

I've made my darling hubby, who has very mixed feelings about my jewelry, a few pieces over the years. A couple of pendants, and a watch. He wears the pendants when he thinks of them, which is averaging once every 4 months or so.. but the watch he really likes, and he wears it everyday to work. In the first picture, you can see what it looked like. I made this originally for him 3 years ago for Christmas. I can't tell you how much it means to me that he likes the watch so much. Everytime he breaks something on it, he wants it fixed asap. He's broken it at least 3 times. Last week he got it caught on machinery at work, and this time he wants something different.. he requested something more reflective of my work now. Something with wirework. He's right; over the last 2 years my work has shifted. Still he's hard on jewelry, so it has to be sturdy. He wanted something simple and manly; cause well, he's a guy. He's also got a 7 inch wrist, which gives me less area to work with. After some study I started working on it last weekend, and just finished it last night. The big square stones in front are bloodstone ( he loves the name of that BTW!) wrapped in 16 ga copper. The wire is way to thick for the stones, so I've actually strung the beads with softflex and then fitted the wraps to the stone, and strung them on like a bead. The spirals are my sneaky way of hiding the crimps, and making it look like everything is wireworked. I'm hoping it will last longer this way also. It gives it very good fit also, being more flexible with beading wire as the base. The large black beads in back are obsidian.


Here is Jerry trying to look like Christen from Project Runway.


Ok, metalsmithing. I'm taking a class at the art center here in Des Moines. I'm also working my way through a couple of books and Don Norris's CD. Somewhere towards the end of this blog should be a picture of the first item I've made using sterling soldering. ( I tried to solder once before with a soldering iron and base metal solder.. don't ask, I'm not counting those and neither should you!) It's a paw print in silver, on copper backing. I had this great scheme of making this really kewl locket thingie.. instead I used way to much solder and well, now it's a zipper pull on one of my bead bags. Despite looking like it's caught a diseased with all the extra solder I like it, and maybe after a few more experiments I'll make another that that doesn't have dying solder bleeding all over it! I've made a few other things with solder since, just to practice. I'll have more pictures next time. I think I'm just trying to go to fast- I have so many ideas bouncing around in my head, but I don't have the skill set yet to do them. I need to take deep breaths, slow down and keep to a simpler scale while I learn. Besides, my torch right now is a propane torch bought at the hardware store. On the other hand, once I graduate into a real metalsmithing torch, I'll have pretty good control.. if I can control a hardware torch then a professional torch should be a cake walk! (sez the ever optimistic Kat) More to come....

Wednesday, April 2, 2008

YOJ: Week 13: still not on topic

I've really been exploring movement in my jewelry lately. This necklace is another experiment on this theme. Each roundel in the center of the necklace is attached to the next one by wire going trough the spiral. The picture really doesn't show this concept well, but it acts and feels like one of those metal linked watch bands... kind of kewl, but I think my execution needed to be better. I"m pretty pleased by my hand forged hook on the end... I never seem to get the proportions right on the hooks, but this is spot on.


Another theme I've been exploring is broaches or pins. These are called "scatter pins" and are in a book ( which I can't remember the title to right now) They are fun and quick to make, I'm toying with adding these to my jewelry shows, probably at the $10.00 price point... at least for the sterling ones. Last up is a heart pendant. This is my "green" story for the week! I made the sterling heart pendant over a year ago, and misjudged how much wire to coil around the heart frame. ( it originally ran out half way through the 2ND hump) I thought it looked ghastly! I threw it into my sterling scrap pile in disgust. A couple of months ago I decided to turn my scrap in for $$, and discovered several medium chunks of wire that I could smooth out and use, several 1-1/2 to 3 inch pieces that I can make into head pins.. and a few really large chunks of wire from "failed" projects. With silver prices what they are, I decided to recycle more directly. I spent an evening watching TV and sorting through my scraps, pulling out any reasonably usable chunks of wire. With a year or more distance ( and frankly better wire skills since) I looked at this heart with new eyes... and unwound the heart back to the first hump, trimmed and filed, and it looked OK... but alittle naked. A quick dig around I found this drop bead and decided that would be prefect.. I now have a nice pendant that only took me half an hour or so to make... if you discount the couple of hours I probably spent on the heart part over a year ago!! Still, even after rescuing lots of wire bits, I had over 11 oz of silver to trade in. I've been collecting the silver bits for the past 4 or so years.. not to bad eh? Now that I'm learning metal smithing techniques I'll probably remelt the silver to reuse in the future!